Friends, food, and flourishing

Selecting interaction objects with rays

Players walk around a level. They approach an object, and an “E to interact” message appears. How does that work?

In the past, I’ve used colliders. The GameObject representing the player has a collider, and so does every intractable object. The collider on the object is a trigger. In a controller class for the interactable, there’s code in OnTriggerEnter().

Easy-peasy. An approach covered in dozens of books, courses, and tutorials on the interwebs. That’s what I mainly did in CK.

The problem

There’s a problem, though. When you make levels, you have to put interactables far enough apart, so there isn’t a point in the game that triggers more than one interactable. It gets worse when you spawn interactables dynamically. They might pop into existence such that their colliders overlap with each other, or with static level objects. It’s even worse when the spawned thingummies move around.

In one part of CK, I used a different approach: fire a ray out from the player, in the direction the player’s GO is pointing. An interactable in the path of the ray out to a meter or two gets the “E to interact” treatment.

I used this approach for the trophy display in Matcha’s house. The trophies are too close to each other to rely on separate colliders.

I decided to use the ray method for all interactables in the library. The deets will change as the project continues, but this works right now.

What players see

Here’s what it looks like to players, when they’re within 1.25 meters (about the length of an arm) of a door, and looking at it.

Interact with a door

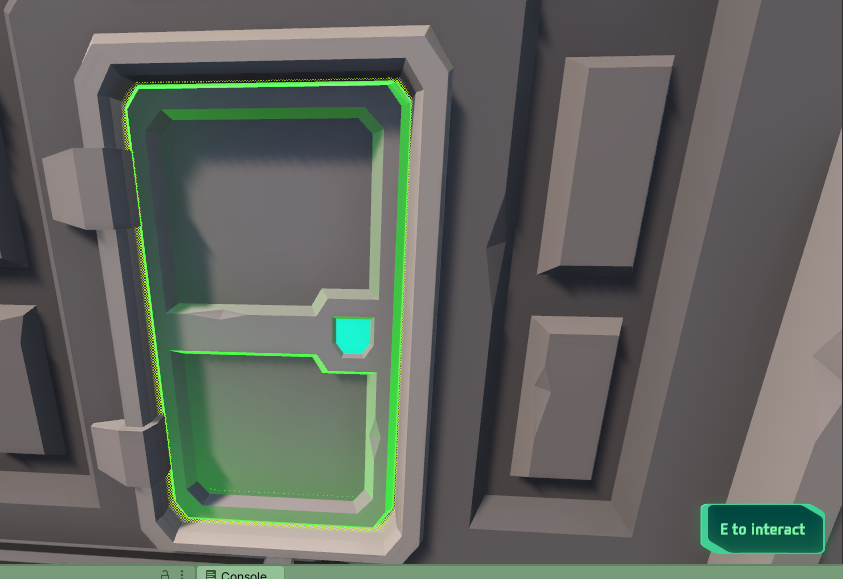
The highlighting makes it clear what they’re interacting with.

You have to look directly at the door. Being close isn’t enough. In this one, the player is close, but not looking directly at the door.

Not looking at door

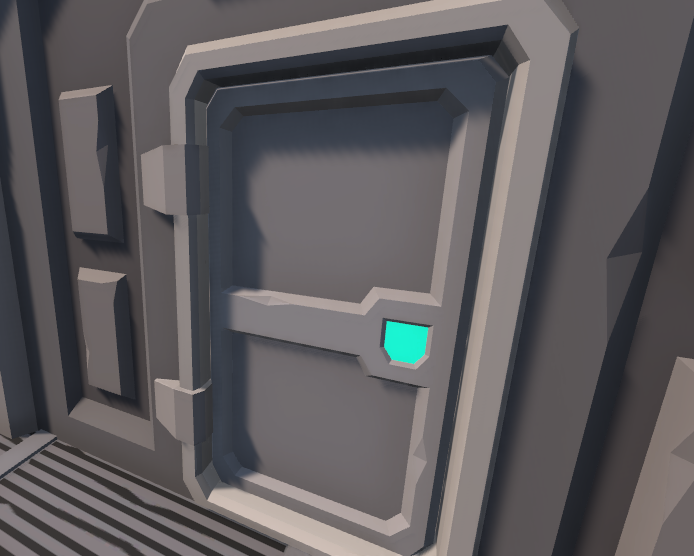
I can control the interaction region for each object. Here, the player’s gaze selects the pad, a small object:

Interactable pad

Notice they don’t have to look directly at the pad. They can be a little off. I should probably do that for the door, come to think of it.

I can change the interaction region for each interactable because the region is defined by interactables’ colliders, not their meshes. Changing an object’s colliders doesn’t affect its appearance.

How it works

I use the Easy Character Movement 2 asset for the first-person controller. It has an Eye object.

Eye in Easy Character Movement 2

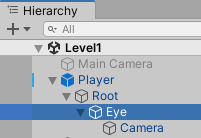
Attached to the eye is a ray sensor, from the SensorToolkit. (I’m using version 1, rather than the current version 2, since there’s an upgrade fee.)

Ray sensor

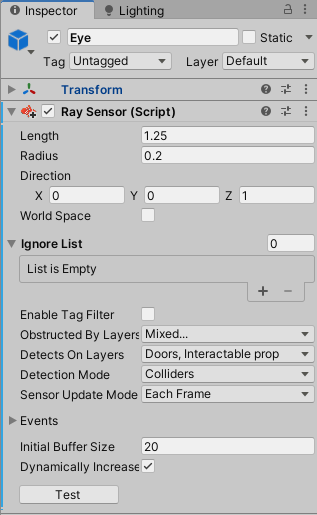
A ray is projected from the Eye. It’s 1.25 meters long, with a radius of 20 centimeters.

Detection Mode says the sensor looks for colliders, not meshes, that intersect with the ray. This is what gives you control over the detection range of individual objects. Adjust their colliders, and Bob’s your uncle.

Notice the Obstructed by Layers, and Detect On Layers fields. Using layers is key to getting the most out of the sensor. Here are custom layers in the project:

Layers

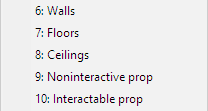
Objects are assigned to layers. Interactable doors are in Doors, the pad above is Interactable prop.

The ray sensor detects objects on the Door and Interactable prop layers. The ray is blocked by objects on these layers:

Blocking layers

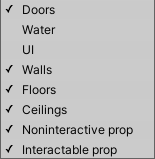
So, objects block rays from objects behind them. If I wanted something inside glass to be interactable, I could change the layers to do that.

Bring on the code

InteractableController is an abstract base class for all interactables. Doors, aliens, books, whatevs.

				
					using Custom.Scripts.Support;
using HighlightPlus;
using UnityEngine;

namespace Custom.Scripts.Interactable
{
    /// <summary>
    /// Base class for interactable objects, like doors. 
    /// </summary>
    public abstract class InteractableController: MonoBehaviour, IInteractable
    {
        // The highlighting component.
        private HighlightEffect _highlightEffect;

        // Can turn object interaction off.
        public bool isInteractionEnabled = true;

        public void Awake()
        {
            _highlightEffect = GetComponent<HighlightEffect>();
            Utilities.AssertIsNotNull(_highlightEffect, "Door has no highlighter.");
        }

        // Called when the interact key/button is pressed.
        public abstract void InteractWithPlayer();

        // Show the item is interactable.
        public void HighlightForInteraction()
        {
            if (isInteractionEnabled)
            {
                _highlightEffect.highlighted = true;
            }
            else
            {
                _highlightEffect.highlighted = false;
            }
        }
        
        /// <summary>
        /// Make it look not interactable.
        /// </summary>
        public void UnhighlightForInteraction()
        {
            _highlightEffect.highlighted = false;
        }

        /// <summary>
        /// If the object highlighted for interaction?
        /// </summary>
        /// <returns>True if highlighted.</returns>
        public bool IsHighlightedForInteraction()
        {
            return _highlightEffect.highlighted;
        }
    }
}


The highlighting effect is supplied by the asset Highlight Plus. It offers a HighlightEffect component that you can see referenced in Awake().

Here’s a class that implements InteractableController:

				
					using DG.Tweening;
using InspectorGadgets.Attributes;
using UnityEngine;

namespace Custom.Scripts.Interactable
{
    public class HingedDoorController : InteractableController
    {
        [Required]
        [SerializeField]
        private float closedYRotation = 90f;
        
        [Required]
        [SerializeField]
        private float openYRotation = 0f;
        
        [Required]
        [SerializeField]
        private float rotationAnimationTime = 1.5f;

        /// <summary>
        /// Is the door open?
        /// </summary>
        /// <returns></returns>
        private bool IsDoorOpen()
        {
            bool result = Mathf.Approximately(transform.localEulerAngles.y, openYRotation);
            return result;
        }
        
        /// <summary>
        /// Player interacts with the door.
        /// </summary>
        public override void InteractWithPlayer()
        {
            Vector3 destinationRotation = new Vector3(
                0f,
                IsDoorOpen() ? closedYRotation : openYRotation,
                0f
            );
            transform.DORotate(destinationRotation, rotationAnimationTime);
        }
    }
}


The class is attached to each hinged door. It uses the asset DOTween Pro to animate the door swinging open.

The PlayerController class, attached to the player GameObject, does most of the work.

				
					using System.Collections.Generic;
using Custom.Scripts.Interactable;
using Custom.Scripts.Support;
using EasyCharacterMovement;
using InspectorGadgets.Attributes;
using SensorToolkit;
using UnityEngine;

namespace Custom.Scripts.Player
{
    
    public class PlayerController : MonoBehaviour
    {
        
        [Tooltip("Log when there is more than one interactable that could be highlighted?")]
        // ReSharper disable once RedundantDefaultMemberInitializer
        [SerializeField] private bool reportSimultaneousInteractables = false;

        // The looky loo.
        [SerializeField]
        [Required]
        private RaySensor raySensor;

        // Where to send interaction events.
        private InteractableController _activeInteractableController;
        
        // It knows things.
        private KnowerOfThings _knowerOfThings;

        // The ECM2 thing.
        private FirstPersonCharacter _firstPersonCharacterController;

        private void Awake()
        {
            _knowerOfThings = Utilities.GetKnowerOfThings();
            raySensor.OnDetected.AddListener(OnSensorDetectedThing);
            raySensor.OnLostDetection.AddListener(OnSensorLostSightOfThing);
            _firstPersonCharacterController = GetComponent<FirstPersonCharacter>();
        }

        /// <summary>
        /// The sensor on the eyes detected something.
        /// There should be exactly one thing that is:
        /// 1. Detected by the sensor, and
        /// 2. Has an InteractableController.
        /// </summary>
        /// <param name="thing">What was detected</param>
        /// <param name="sensor">The thing that detected it</param>
        private void OnSensorDetectedThing(GameObject thing, Sensor sensor)
        {
            // The controller to interact with.
            InteractableController interactableControllerToUse;
            if (sensor.DetectedObjects.Count == 0)
            {
                // This makes no sense. Detected something, but nothing in list.
                Utilities.ReportError("Argh! Sensor reports detecting something, but list MT!");
                return;
            }
            if (sensor.DetectedObjects.Count == 1)
            {
                // Detection list just has one thing.
                // Does the thing have an InteractableController?
                interactableControllerToUse = thing.GetComponent<InteractableController>();
                if (interactableControllerToUse == null || ! interactableControllerToUse.isInteractionEnabled)
                {
                    // No. Exit.
                    return;
                }
                // Yes. Continue.
            }
            else
            {
                // More than one interactable thing was detected. 
                // Make sure only one of them has an InteractableController.
                List<InteractableController> interactableControllers = new List<InteractableController>();
                foreach (GameObject detectedObject in sensor.DetectedObjects)
                {
                    InteractableController anInteractableController =
                        detectedObject.GetComponent<InteractableController>();
                    if (anInteractableController != null && anInteractableController.isInteractionEnabled)
                    {
                        interactableControllers.Add(anInteractableController);
                    }
                }
                if (interactableControllers.Count == 0)
                {
                    // This is OK.
                    return;
                }
                if (interactableControllers.Count == 1)
                {
                    // This is OK too.
                    interactableControllerToUse = interactableControllers[0];
                }
                else
                {
                    // More than one, so we don't know which to interact with.
                    // Report it?
                    if (reportSimultaneousInteractables)
                    {
                        string objectNames = "";
                        foreach (InteractableController controller in interactableControllers)
                        {
                            objectNames += controller.gameObject.name + " ";
                        }

                        Utilities.ReportError($"More than one detected interactable thing: {objectNames}");
                    }
                    return;
                }
            } // End more than one interactable.
            // Remember the righteous interaction controller.
            _activeInteractableController = interactableControllerToUse;
            // Display things.
            _activeInteractableController.HighlightForInteraction();
            _knowerOfThings.promptManager.ShowInteractionPrompt();
        }

        private void OnSensorLostSightOfThing(GameObject thing, Sensor sensor)
        {
            InteractableController interactableController = thing.GetComponent<InteractableController>();
            if (interactableController != null)
            {
                interactableController.UnhighlightForInteraction();
                _knowerOfThings.promptManager.HideInteractionPrompt();
                _activeInteractableController = null;
            }
        }

        /// <summary>
        /// Player pressed the interact key.
        /// </summary>
        public void OnInteract()
        {
            if (_activeInteractableController != null)
            {
                _activeInteractableController.InteractWithPlayer();
            }
        }

    }
}


Awake() sets up some event handlers, for when the sensor detects something, and when it loses detection. The method OnSensorDetectedThing() runs when the sensor’s ray detects an object (that is in a detection layer, and not blocked).

OnSensorDetectedThing() decides what was detected, and how to handle it. sensor.DetectedObjects is an array of things detected. If just one thing is detected, that becomes the _activeInteractableController. If more than one thing is detected, and more than one of those things in active, OnSensorDetectedThing() doesn’t know which one to highlight. At the moment, it just reports that, but a better approach might be to detect the first thing in the array. We’ll see how it works out.

If OnSensorDetectedThing() decides on an object, it tells the object to highlight itself, and tells the prompt manager to show the interaction prompt.

The future

This all works well so far. No doubt, I’ll change it as I learn more. Such is programming.

Leave a Reply

Your email address will not be published. Required fields are marked *

css.php